Volcano Cake
featured in 4 Fancy Cakes To Impress Your Guests
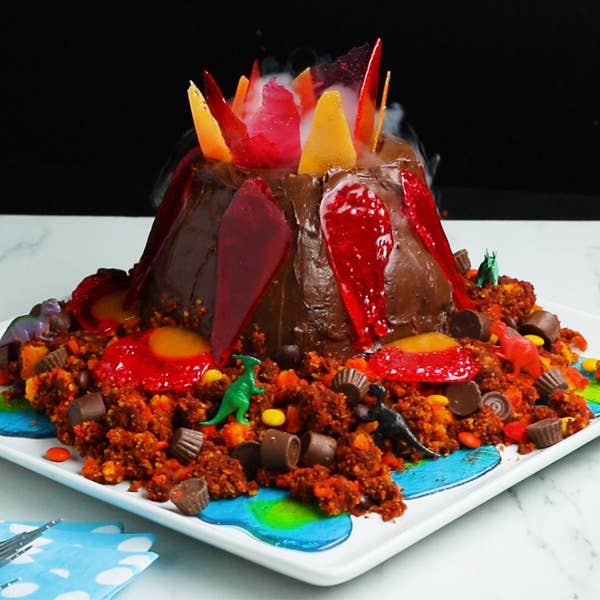
This show-stopping volcano cake is perfect for a birthday party. Your guests will be in awe when you add the dry ice and water to the mason jar hidden inside of the cake. There are several steps that go into making this masterpiece, so save time by using box cake mix and store-bought frosting.
83% would make again
Total Time
2 hr
2 hr
Prep Time
15 minutes
15 min
Cook Time
1 hr
1 hr
Total Time
2 hr
2 hr
Prep Time
15 minutes
15 min
Cook Time
1 hr
1 hr
Ingredients
for 20 servings
- 3 boxes white cake mix, batter prepared according to package instructions, divided into 3 bowls
- 5 teaspoons red food coloring, divided
- 3 teaspoons yellow food coloring, divided
- nonstick cooking spray, for greasing
- 24 hard red candies, divided
- 13 butterscotch hard candies, divided
- 12 blue hard candies
- 4 green hard candies
- 4 cans chocolate frosting, divided
- 1 cup chocolate peanut butter cup
- 1 cup chocolate coated caramel bites (200 g)
- ½ cup mini chocolate peanut butter cups (100 g)
- ½ cup water (120 mL)
Special Equipment
- round cookie cutter, 3 in (7 cm)
- cake round, 9 in (22 cm)
- cake turntable
- offset spatula
- mason jar, 8-ounce, about 3-inch-wide (7 cm) mouth
- small dinosaur figurine, optional
- 1 lb dry ice (455 g)
Preparation
- Preheat the oven to 350˚F (180˚C). Grease and line 4 8-inch (20 cm) round cake pans with parchment paper. Note: If you only have 2 8-inch (20 cm) pans, bake the cakes in batches.
- Add 4 teaspoons of red food coloring to one bowl of batter, the remaining teaspoon of red food coloring and 1 teaspoon of yellow food coloring to the next bowl of batter, and the remaining 2 teaspoons of yellow food coloring to the last bowl of batter. Whisk until fully incorporated.
- Pour ½ cup (85 G) of each color batter into each of the 4 cake pans. Repeat, alternating colors, until all of the batter is used. Gently swirl a toothpick through the batter to blend the colors in each pan.
- Bake the cakes according to the box instructions, 25–40 minutes, or until a toothpick inserted in the center of a cake comes out clean. Let cool completely. Keep the oven on.
- Make the hard candy flames, lava and water puddles, and lava drips: Grease 3 baking sheets with nonstick spray and line with parchment paper.
- For the flames, on the left side of a prepared baking sheet, arrange 12 red hard candies, about 1 inch (2 ½ cm) apart, in 4 rows of 3. On the right side of the same baking sheet, place the butterscotch candies in 3 rows of 3, about 1 inch (2 ½ cm) apart. Bake for 4–6 minutes, until the candies are entirely melted together, but not bubbling too much. Let cool completely, then break into large shards. Set aside.
- For the lava and water puddles, arrange 4 evenly spaced clusters of 3 blue and 1 green hard candies on a baking sheet. Place 4 red hard candies at least 1 inch (2 ½ cm) from the clusters and the edges of the pan. Place the remaining 4 butterscotch candies directly next to each red candy. Bake for 4–6 minutes, until melted into pools. Let cool completely.
- For the lava drips, position the remaining 8 red hard candies at least 1 inch (2 ½ cm) apart along a long side of the baking sheet, at least 1 inch (2 ½ cm) from the edge. Bake for 4–6 minutes, until melted. Remove the baking sheet from the oven and very carefully tip the pan so the melted candy slides down, creating a drip effect. Let cool completely.
- Trim the domed tops off the cakes. Use a 3-inch (7 cm) round cookie cutter to punch out holes in the centers of 2 of the cakes. Reserve the cake scraps.
- Assemble the cake: Place a 9-inch (22 cm) cardboard round on a cake turntable.
- Spread a dab of chocolate frosting in the center of the cardboard. Place a whole cake on the round. Using an offset spatula, spread about ½ cup (85 G) of frosting evenly over the top of the cake. Place the other whole cake on top and repeat frosting. Repeat with the remaining 2 cakes with the holes in the center. Place an 8-ounce mason jar in the hole in the center. Use your hand to lightly push the mason jar in until the top is level with the cake. Refrigerate at least 20 minutes, up to 1 hour.
- Carve the volcano: Using a sharp serrated knife, carefully trim down the sides of the cake at an angle so that the base is wider than the top. Make sure to leave a layer of cake at least 1-inch (2 ½ cm) thick around the jar. Reserve the cake scraps.
- Frost the outside of the cake with 4 cups (460 G) of frosting. Refrigerate for at least 20 minutes, up to overnight.
- Make the volcanic crumbles: Add 2 cups (230 G) of frosting to the bowl of cake scraps and mix with an electric hand mixer until coarsely crumbled.
- Assemble the volcano cake: Carefully transfer the cake to a platter at least 12 inches (30 cm) wide, positioning it near one corner. Place the melted blue-green candy puddles around the edges of the platter.
- Add the volcanic crumble around the base of the cake, and partially covering the candy puddles. You may not need to use all of the crumble. Sprinkle the chocolate peanut butter candies, mini chocolate peanut butter cups, and chocolate-coated caramel bites evenly over the crumble.
- Place the red hard candy drips around the sides of the cake, positioning them near the top. Place the red candy puddles on top of the crumble under the drips.
- Place the red and yellow candy shards along the top rim of the cake, surrounding the mason jar.
- Position the dinosaur figurines around the volcano, if using.
- When ready to present the cake, carefully use tongs to place a piece of dry ice in the mason jar. Pour room temperature water over the dry ice to create a smoke effect.
- Use tongs to carefully remove the mason jar before slicing and serving.
- Enjoy!
- Your favorite recipes are just a click away. Download the Tasty app to save and organize your favorites.
