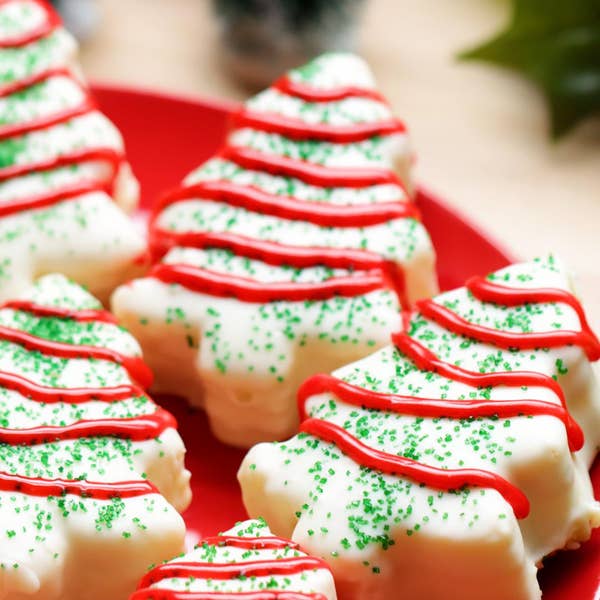
Little Debbie-Inspired Christmas Tree Cakes
For this classic Little Debbie-copycat dessert, sandwich a creme filling between two layers of soft vanilla cake and stamp out with a Christmas tree-shaped cookie cutter. Coat each cake in white candy melts and decorate with green sugar sprinkles and a red icing garland. Consider these snack cakes Santa-approved!
Tasty Team
83% would make again
Total Time
1 hr 40 min
1 hr 40 min
Prep Time
15 minutes
15 min
Cook Time
10 minutes
10 min

Total Time
1 hr 40 min
1 hr 40 min
Prep Time
15 minutes
15 min
Cook Time
10 minutes
10 min
Ingredients
for 8 cakes
Cake
- nonstick cooking spray, for greasing
- 1 stick unsalted butter, room temperature
- 1 cup granulated sugar (200 g)
- 2 teaspoons baking powder
- ½ teaspoon kosher salt
- 2 teaspoons vanilla extract
- ¼ teaspoon almond extract
- 4 large egg yolks
- 1 ½ cups all purpose flour (185 g), sifted
- ⅔ cup milk (160 mL)
- 1 oz spiced rum (30 mL), optional
Filling
- 4 large egg whites
- ¾ cup granulated sugar (150 g)
- ½ teaspoon kosher salt
- 2 sticks unsalted butter, cubed, chilled, but pliable
- 1 teaspoon vanilla extract
- ¼ teaspoon almond extract
For Decorating
- 10 oz vanilla candy melts (295 g)
- 2 tablespoons green sanding sugar
- 1 tube red cookie icing
Special Equipment
- 1 christmas tree-shaped cookie cutter
Nutrition Info
- Calories 499
- Fat 17g
- Carbs 71g
- Fiber 0g
- Sugar 57g
- Protein 11g
Estimated values based on one serving size.
Preparation
- Make the cake: Preheat the oven to 350°F (180°C). Spray 2 9 x 13-inch rimmed baking sheets with nonstick spray and line with parchment paper.
- in a large bowl, use an electric hand mixer on medium speed to cream together the butter, sugar, baking powder, salt, vanilla, and almond extract until light and fluffy, about 5 minutes.
- With the mixer running on medium speed, add the egg yolks, 1 at a time, beating between each addition until fully incorporated.
- Add a third of the flour and continue mixing until just incorporated. In a small bowl, combine the milk and rum, if using. Add half of the milk mixture to the batter and mix until nearly combined. Continue alternating additions of the flour and milk, using a rubber spatula to finish bringing the batter together.
- Divide the batter between the prepared baking sheets, spreading evenly all the way to the edges. Bake for 10 minutes, rotating the pans halfway through, until the cakes are pale golden brown and the edges begin to pull from the sides of the pans. Remove from the oven and let cool.
- Meanwhile, make the filling: Fill a large pot with 1 inch of water. Set a large heat-safe bowl over the pot, making sure the bottom is not touching the water. Add the egg whites, sugar, and salt to the bowl and whisk together until homogenous. Turn the heat to medium and continue whisking until the mixture thickens. When you lift the whisk, the mixture should fall into the bowl in ribbons that hold their shape for a moment before disappearing.
- Remove the bowl from the heat and place on a towel on a flat surface. With an electric hand mixer on medium-high speed, whip the egg white mixture until doubled in volume, about 5 minutes. Reduce the mixer speed to medium and, with the mixer running, add the butter, a cube at a time. As you add the last piece of butter, the mixture will look broken; don’t worry! Continue mixing until the mixture smooths out again, about 1 minute. Add the vanilla and almond extract and mix until just incorporated.
- Assemble the cakes: Invert a cake onto a cutting board with a piece of parchment on top and peel away the parchment from the bottom of the cake. Carefully flip the cake over so the flat side is on the bottom again. Spread the filling evenly over the cake, then invert the remaining cake on top of the filling. Peel off the parchment from the top of the cake. Transfer the cutting board with the cake to the freezer and freeze until the cake is hardened, but not completely frozen, about 1 hour.
- Line a baking sheet with parchment paper.
- Remove the cake from the freezer. Use the Christmas tree-shaped cookie cutter to cut out 8 cakes and place on the prepared baking sheet. Discard (or snack on) the cake scraps. Chill the cakes in the refrigerator while you prepare the decorations.
- Add the candy melts to a microwave-safe bowl and microwave according to the package instructions until melted.
- Dip each cake in the melted candy, using a fork to flip until completely coated. Carefully lift the cake out of the candy and gently scrape the bottom across the side of the bowl to remove any excess. Return the coated cake to the baking sheet. Repeat with the remaining cakes.
- Sprinkle the cakes lightly with the green sanding sugar, and then decorate with the red cookie icing. Refrigerate until the candy shell hardens, about 5 minutes.
- Enjoy!
- Cook smarter, not harder. Use our AI chef Botatouille on the Tasty app. Download now.
