Sourdough Starter
This sourdough starter recipe takes a bit of effort to get going, but once it’s ready you’re in for endless delicious bread. Don’t be discouraged if your starter isn’t ready in a few days- it takes a little time for it to level out. Keep in mind your sourdough starter is sensitive to temperature, so if your house is very warm, use cooler water, and if your house is chilly, use warmer water.
Tasty Team
83% would make again
5 minutes
5 minutes
Ingredients
for 1 cup
- ⅓ cup whole wheat flour (50 g), plus more for feeding
- ⅓ cup bread flour (50 g), plus more feeding
- ⅓ cup warm water (100 g), plus more for feeding
- cool water, for testing
Special Equipment
- clear lidded pint container, or larger
- food scale, or cups and measuring spoons
- rubber band, or tape
Nutrition Info
- Calories 327
- Fat 1g
- Carbs 67g
- Fiber 6g
- Sugar 0g
- Protein 11g
Estimated values based on one serving size.
Preparation
- Day 1: Add 50 grams whole wheat flour, 50 grams bread flour, and 100 grams warm water to a clear lidded container with a capacity of 1 pint or more. Mix until there are no dry spots. Scrape down the sides of the container with a spatula. Cover with a lid.
- Use a rubber band or piece of tape to mark the mixture level. This will allow you to track any movement (eventually it will grow!) Set the starter in a warm spot. Let sit for 24 hours.
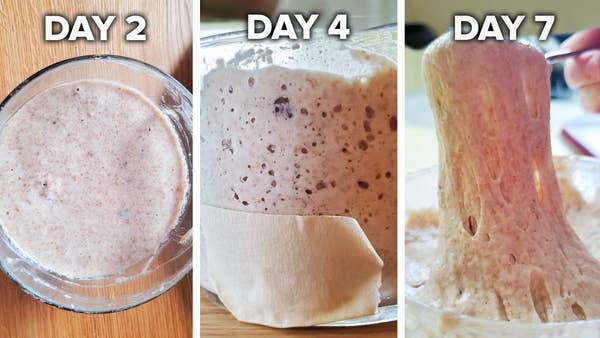
- Day 2: After 24 hours, open the container and look for signs of fermentation in the form of bubbles on top, volume growth, and/or a funky, slightly sweet acidic smell. If you see some of these signs, proceed to the next step. If not, cover the starter again and let sit for another 12–24 hours, until these signs appear. If the temperature in your house is cool, it may take a bit longer.
- Once the starter has gotten a bit bubbly and funky, it is time to discard and feed. Discard all but about 25 grams (2 tablespoons) of starter (see Note below on how to minimize waste!). Add another 100 grams warm water and stir to dissolve the remaining starter. Add 50 grams of bread flour and 50 grams of whole wheat flour and stir until there are no dry spots. Cover and let sit in a warm spot for another 24 hours.
- Days 3–15: Repeat the feeding process every day for 7–14 days. Eventually, a few hours after feeding, the starter will begin to grow, almost doubling in size, then deflate again. Once your starter is rising and falling regularly, it is in a good place.
- To test the readiness of the starter, do a float test: Fill a cup with cool water. Use a clean spoon to take a scoop of the starter (be careful not to stir the starter and deflate the air bubbles that make it float) and carefully plop it in the water. If it floats, it is gassy and alive and ready to make some bread! If not, don’t despair, it can take a while to get going. Either wait longer if it has only been a few hours since feeding, or if it has been closer to 24 hours since feeding, discard and feed again.
- After passing the float test, the starter is ready to use for baking! You may find you like to use your starter when it is young, only a few hours after feeding when it just passes the float test. At this point it will smell sweet. If you want a more sour taste, use the starter 6–12 hours after feeding, when it will be more mature and smell a bit more vinegary and funky. This is up to you!
- Mold: If you see any fuzzy moldy spots on your starter that are black, red, or blue, unless it is very easy to scrape them off the top, unfortunately you need to start over. Sometimes, a while after feeding or being in the refrigerator, the starter will develop a dark, clear liquid on top. This is called hooch and is harmless. Just pour the liquid off!
- Flour: Use what you have. If you only have all-purpose flour, you can use that. If you only have bread flour, use that. If you only have whole wheat flour, you can use that, just know that you may need to feed more often because it gets funky more quickly.
- Discard: It may be tempting not to discard most of your starter every time you feed it because you don’t want to waste, but we discard for a variety of reasons. We are giving the starter a lot of fresh food and water to eat. If we don’t discard, the starter will retain a lot of that funkiness and also eventually grow to be huge if you just keep adding water and flour to it. I like to discard into another container and keep that container in the refrigerator until I need it for other baking projects. You can fold the discard into banana bread, pancakes, cookies, etc.
- Storage: Once your starter is up and running, you can either keep it at room temperature and feed it daily, or store it in the refrigerator. To store in the refrigerator, do a regular discard and feed, then place in the refrigerator. A day before you want to begin making bread, pull the starter out and let it come to room temperature. Then, discard and feed as usual.
- Scaling: This starter recipe calls for equal amounts of water and total flour by weight. You can scale this recipe up or down as needed, depending on how much starter the recipe you are going to make calls for.
- Enjoy!
- Meal planning made easy with the Tasty app. Download now to see exclusive curated meal plans.
Trending Recipes