Pull-Apart Marbled Taro Bread
featured in 6 Ways To Enjoy Buns
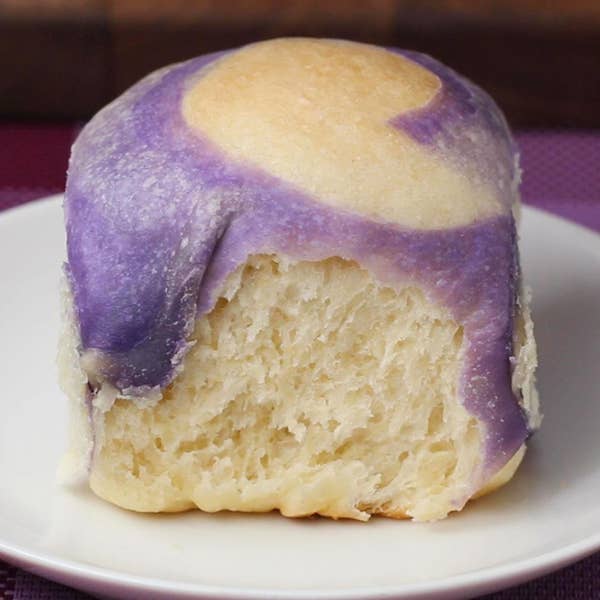
These marbled taro buns are pillowy soft in texture with the perfect amount of sweetness–you’ll want to make them every week for breakfast. Make sure to purchase big taro root at the store; unlike little taro root, big taro has purple-flecked flesh. Also, take care to wear gloves when handling the raw taro root, as it can cause skin irritation. While they take a bit of time to make, these buns are definitely worth the effort.
Tasty Team
87% would make again
Total Time
5 hr 15 min
5 hr 15 min
Prep Time
20 minutes
20 min
Cook Time
1 hr 50 min
1 hr 50 min
Inspired by food52.com
Total Time
5 hr 15 min
5 hr 15 min
Prep Time
20 minutes
20 min
Cook Time
1 hr 50 min
1 hr 50 min
Ingredients
for 9 buns
Taro Paste
- 1 lb big taro root (455 g), peeled and cubed
- cold water, as needed
- ½ teaspoon kosher salt
- 2 tablespoons unsalted butter
- ⅓ cup sugar (65 g)
Milk Buns
- 2 ½ cups bread flour (310 g), plus 2 tablespoons, divided, plus more for dusting
- ⅓ cup water (80 mL)
- 1 large egg, lightly beaten
- 1 tablespoon instant yeast
- 2 tablespoons dried nonfat milk powder
- 1 teaspoon kosher salt
- ½ cup sugar (100 g)
- 4 tablespoons unsalted butter, melted
- ½ cup whole milk (120 mL), warm
- nonstick cooking spray, for greasing
Marbled Crust
- 1 cup all purpose flour (125 g), divided
- ½ teaspoon salt, divided
- 1 tablespoon sugar, divided
- 2 tablespoons canola oil, divided
- 4 tablespoons water, divided
- 3 drops purple food coloring
Nutrition Info
- Calories 585
- Fat 13g
- Carbs 64g
- Fiber 11g
- Sugar 16g
- Protein 8g
Estimated values based on one serving size.
Preparation
- Note: always wear gloves when handling raw taro, as it can cause skin irritation
- Make the taro paste: Add the taro root to a medium pot and cover with cold water by 1 inch (2 ½ cm). Bring to a boil over medium-high heat, then cook for about 20 minutes, until fork tender. Drain.
- Transfer the taro to a food processor. Add the salt, butter, and sugar and process until smooth. Transfer to a small bowl and let cool completely. The taro paste can be made up to 2 days ahead and stored in an airtight container in the refrigerator. Bring to room temperature before using.
- Make the milk buns: In a small saucepan, whisk together 2 tablespoons of bread flour and the water. Cook over medium heat for about 3 minutes, stirring continuously, until the mixture thickens. Remove from the heat and transfer to a small bowl. Let cool completely.
- In a large bowl, combine remaining 2½ cups (310 G) ( bread flour, cooled flour and water paste, egg, yeast, milk powder, salt, sugar, butter, and milk. Use a rubber spatula to mix into a shaggy mass, then turn out onto a lightly floured surface and knead for 5-6 minutes, until mostly smooth.
- Transfer the dough to a clean, lightly greased bowl. Cover with a kitchen towel and let rest in a warm place for about 90 minutes, or until almost doubled in size.
- Make the marbled crust: In a medium bowl, combine ½ cup (60 G) all-purpose flour, ¼ teaspoon salt, ½ tablespoon sugar, 1 tablespoon canola oil, and 2 tablespoons water. Mix until mostly combined, then turn out onto a lightly floured surface and knead for 1-2 minutes, until smooth. Cover with plastic wrap and let rest for 10 minutes. Repeat with the remaining ingredients, adding the purple food coloring as well.
- Once the dough has rested, roll both portions out to flatten. Stack the white dough on top of the purple dough and press down to seal. Roll out to a 5-inch (11 cm) square, then roll the square into a tube. Roll to seal and lengthen slightly. Cut the tube into 9 equal pieces. Use your hands to smash each piece down, spiral side up. Use a rolling pin to roll each portion into about 4-inch (10 cm) ( circles. Cover lightly with plastic wrap until ready to top the buns.
- Once the milk bun dough has risen, divide into 9 3-ounce (90 G) portions. Cover lightly with plastic wrap. Take 1 piece and flatten it into a 4-inch (10 cm) circle. Scoop 2 tablespoons of taro paste into the center. Bring the edges of the dough together and seal with your fingers (this will be the bottom). Repeat with remaining dough and taro paste.
- Lightly brush the tops of the buns with water. Place a marbled circle over each bun and use your hands to seal the edges.
- Grease a 9-inch (22 cm) square baking dish with nonstick spray, then line with parchment paper.
- Place the buns in the prepared baking dish. Cover with a kitchen towel and let rise for another hour, until almost doubled in height.
- Preheat the oven to 350°F (180°C).
- Bake the buns for 25–30 minutes, until your finger doesn’t leave an indent in the dough when pressed.
- Let the buns cool for 10 minutes in the pan, then transfer to a wire rack to continue cooling.
- Enjoy!
- Cook smarter, not harder. Use our AI chef Botatouille on the Tasty app. Download now.

Inspired by food52.com